|
|
The Saved tab on the AIMS Filters window stores and saves your filters. You can save combinations of attribute and spatial filters.
A. Review the AIMS Filters window
1.Click the Filters icon on the left-hand vertical tool bar of the Condition Map to open the AIMS Filters window: . .
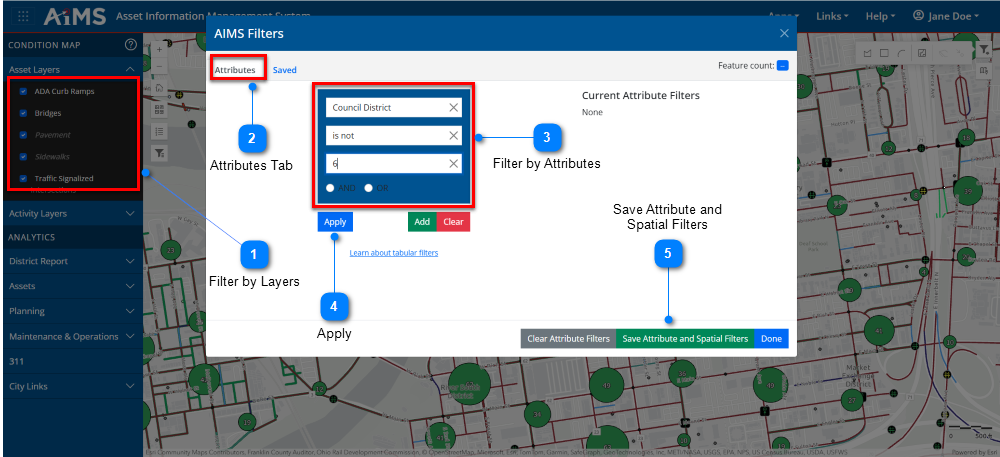
2.The AIMS Filters window opens. Follow the numbered instructions beneath the illustration.
|

|
Filter by Layers
|
|
Existing layer filters appear in the left-hand panel (selected layers have check marks next to them). Create any additional layer filters by checking or unchecking the blue check boxes. Learn more here: Filter by Layers
|
|

|
Attributes Tab
|
|
When the AIMS Filters window opens, the Attributes tab opens by default; is used to define attribute filters.
|
|

|
Filter by Attributes
|
|
These fields show you the latest attribute filter. You can enter a different attribute, operator, and value and press Apply to create another attribute filter. Learn more here: Filter by Attributes
|
|

|
Apply
|
|
Click Apply to execute the attribute filter.
|
|

|
Save Attribute and Spatial Filters
|
|
Click the Save Attribute and Spatial Filters button in the AIMS Filters window. This will save any attribute and spatial filters filters you have applied -- not just attribute filters, but also the spatial filters.
|
B. Save the filter in the Saved tab. Once you click Save Attribute and Spatial Filters, the Saved tab opens.
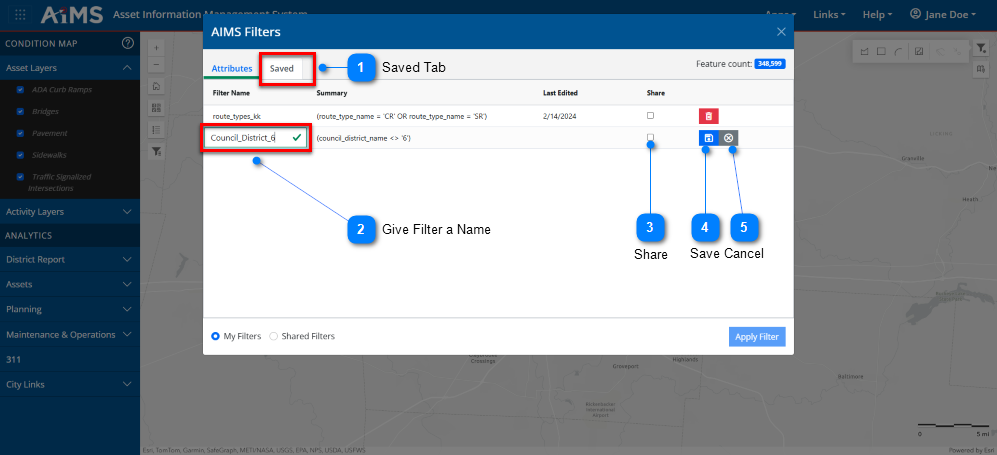
Follow the numbered instructions beneath the illustration.
|

|
Saved Tab
|
|
Make sure the Saved tab is open.
|
|

|
Give Filter a Name
|
|
Notice the new row. This is where you type a name of the new filter you just created. In this example, the name is No_CouncilDistrict6.
•If this is a spatial filter, you will see the words, "Spatial filter" (not shown in this illustration).
•If this is an attributes filter, you will see the attributes, operators, and values associated with it. For example: (council_district_name <> '6') (shown in this illustration).
•If you have both a spatial and an attributes filter, you will see a "+" sign between them. For example: Spatial filter + (council_district_name <> '6') (not shown in this illustration)
•NOTE: Layer filters are generally not listed.
|
|

|
Share
|
|
Click the Share check box if you want to share the filter with other people who have access to AIMS within the organization (no check mark in this illustration).
|
|

|
Save
|
|
Click the Save icon. This filter is now saved under your account and can easily be used for future analysis by selecting the filter from the list and clicking Apply Filter. Learn more here: Apply Saved Filters
|
|

|
Cancel
|
|
Cancel the operation of saving a filter.
|
C. Take other actions in the Saved tab. There are a number of actions you can take when the Saved tab is open, once you've saved a filter.
1.Follow the numbered instructions beneath this illustration.
.png)
|

|
Saved Tab
|
|
Make sure the Saved tab is open with the list of all previously saved filters you created.
|
|

|
Summary
|
|
This column indicates whether a filter is an attribute or spatial filter. Attribute filters show a query expression and spatial filters show the words, "Spatial filter." Layer filters are not shown..
|
|

|
Delete
|
|
Click the red Delete icon to delete a filter.
|
|

|
Share
|
|
Put a check mark in the Share check box to share any custom filter with the organization.
|
|

|
Apply Filter
|
|
Highlight any row to select the filter; then click Apply Filter to apply the filter to the map..
|
|

|
Toggle Between My Filters and Shared Filters
|
|
Select the type of saved filters you want to view:
•Shared Filters - Filters that have been shared with you by others in the organization. Other people have created them, but you are still able to use them.
•My Filters - Filters that you have previously created. You may have shared them with others, but they are still your filters.
|
|
|

